Archive for November, 2015

Defense against missiles 101

Posted in Design system, Intercept, Rules on November 22, 2015 by Mr Backman

At 06:00 on 22 September, the weather had calmed and the ships were patrolling at 10 knots, line abreast, 2 nmi apart. Lookouts were posted for submarine periscopes or ships and one gun either side of each ship was manned. U-9 had been ordered to attack British transports at Ostend, but had been forced to dive and shelter from the storm. On surfacing, she spotted the British ships and moved to attack.

At 06:20, the submarine fired one torpedo at the nearest ship from a range of 550 yd, which struck Aboukir on the starboard side, flooding the engine room and causing the ship to stop immediately. No submarines had been sighted, so Drummond assumed that the ship had hit a mine, and ordered the other two cruisers to close in to help. After 25 minutes, Aboukir capsized, sinking five minutes later. Only one boat could be launched, because of damage from the explosion and the failure of steam-powered winches needed to launch them.

U-9 rose to periscope depth from her dive after firing the initial torpedo to observe two British cruisers engaged in the rescue of men from the sinking ship. Weddigen fired two more torpedoes at his next target, Hogue, from a range of 300 yd. As the torpedoes left the submarine, her bows rose out of the water and she was spotted by Hogue, which opened fire before the submarine dived.

Livebait squadron of September 22 1914

Free trader firing missile

Image by Rob Caswell

Missiles are deadly in Intercept, especially those with the Cold start option that are really tricky to detect when drifting. The controlling ship may be far away and unlike beam attacks, the attacker isn’t giving himself away when attacking. So, how does one go about reducing the risk of missile death?

The basics

Missiles move last, after all ships have moved. They are still moved in reverse Initiative order but after all of the ships has done the same. Small missiles typically have an endurance of 15 minutes which mean their range is limited to the distance from the launching ships Drift and you. This means that if your ship is beyond 6 squares from the attacking ships Drift, no unmodified small missile can hit you. Safe, assuming they are not modified, assuming you track the enemy ship and thus know its Drift position, lots of assumptions.

In reality you may have a hunch on from what direction a missile attack will come from, based on the scenario. Always make sure you have lasers covering that direction through their attack arc, and make damned sure your aft centerline isn’t pointing towards the threat direction.

Radar

If the enemy is Tracking you, you might as well use your Radar. Setting a 1×1 square Radar Scan on top of your ship gives a +6 in Scan strength and small missiles have a Radar signature of +2. This should almost guarantee that any missile will be Tracked before impacting, so you avoid the -3 DM for defending against unknown attacks. As Intercept only allow two Scans per side per turn this isn’t practical for many dispersed ships but keeping them in close formation might help.

Cold start missiles

Cold start missiles sacrifice 2G for the ability to thrust and drift as they please. This means that a TL 14+ small missile will have 4GTurns of total fuel to maneuver with, larger missiles still have the 4G limit but have better endurance for larger amounts of GTurns. Keep changing vectors of your ship so the unseen Cold start missiles of your enemy must expand precious GTurns to keep up. Perform large IR Scans to see if you can catch a Cold start missile thrusting, a small missile thrusting have an IR Signature of +6 and even if you only get an Indication, you’ll know it’s out there.

Matching vectors

Matching vectors completely is well-nigh impossible but try at least to avoid having a relative vector of 5 or more as this give the missiles +6 on both PEN and DAM! Sure, they also get a -2 DM to hit but do you really dare risking that? Your defense rolls will suffer the same -2 DM too.

Design

Make sure your design have laser turrets on both left and right or both top and bottom. This way at least one will always bear. Large warships can take a lot of damage even from missiles but are still smoked when hit by nukes, add nuclear dampers too in that case. You are allowed two defense rolls against nuke missiles; one from lasers and the other from dampers. As results stack this is pretty effective against the threat of nukes. Two Fair results from lasers and dampers would require the missile volley to be VGood to still hit.

In Traveller, civilians and now allowed to have dampers but then again, neither are they allowed to have nukes. Even pirates usually avoid nukes as they tend to destroy the precious ship and cargo and then they’ll have the Imperial Navy on their ass as nukes are certainly a breach of the Imperial rules of war. Pirates with nukes rarely end up in court, they usually end up dead.

Page 41 cover the basic parameters of missiles and all the options to modify them, except the nuke option which is covered in the optional rules section page 23. Missile parameters are also duplicated on page 45 of the tables section at the back of the rulebook.

Asteroids and maintenence update

Posted in Intercept, Rules on November 20, 2015 by Mr Backman

Image from

“Asteroids do not concern me, I want that ship” – Darth Vader

If you know how to play Intercept already you may skip to the last section of this post, dealing with the newly added Asteroid rules.

The rules have been rearranged slightly to make them easier to learn bit by bit.  The best way to learn these rules quickly is either play with me, I’ll gladly teach you but not everyone live in Uppsala, or even Sweden for that matter. Ask questions here on the blog may also work of course. Another way to learn the rules is that you alone or with a friend try to play a test game. Start off by flipping through the booklet getting a feel for what’s in there, lots and lots of tables, diagrams and text with boldface lines sprinkled here and there. Daunting? Not to worry, the rules are structured in such a way that you can read the rules and learn each stage as you read.

Sequence of play

The first page hold a fairly detailed summary of the sequence of play. Yeah, the black page with a space battle barely discernible behind it and that cool Intercept logo tilted 90 degrees like some kind of layout pro made it, that page. Read this page carefully but you really don’t have to understand it, just familiarize yourself with the order of things. Note that all players do each step in parallel, there is no I-move-shooot-inflict-damaga then You-move-shooot-inflict-damaga.

Initiative

First you read page 2-3 that tell you have to resolve tasks with dice rolling and how the Initiative system works ie in what order within a phase the players perform things. When you have determined Initiative (rolled 2D6 and noted the result, various tie-breakers handle when both rolled the same result. OK, Initiative is determined now go on to movement. Read page 4-5 on movement and perform the movement step by step where low Initiative goes first, then high. If you like you can skip the hidden movement and sensors aspect of the game to make it simpler, just assume that both ships have Tracked result on the other so there’s no need for secret plotting etc.

Sensors

If you want to do the Sensors phase you should read  page 6-7, not that only the first Scan target question need be asked if there’s no planet or asteroid on the map, the question “Does your Scan touch your´ship’s Sunglare column?”. OK, follow the Sensor rules, roll Sensor tasks for getting a tracked result etc. Remember that you don’t have to do this the first time you play but do come back to it later as it is the secret plotting and Sensor rules that set Intercept apart, creating that submarine feeling lacking in all other space combat systems.

Combat

If the ships are close enough for combat you should read page 8-9 for the general procedure of combat and page 10 and 11 for beam combat and missile combat respectively. If you hit and defenses such as sandcasters against lasers, lasers against missiles completely stopped the attack you continue with damage. Page 12-13 tell you how to do hitlocation, penetration and damage. Page 14 explains what effect damage has on the ships six hitlocations and 15 finally explain how you repair damage using the Repair Crew. This is the end of the basic game and all tables as well as important figures are doubled on the last four pages.

Tables

The last four pages could be printed double-sided as each side is used for one distinct part of the game, print one set of these per player. The few tables with gray headings are only used in the optional Deterministic rules (yeah, no random elements at all if you’ prefer that but learn the basic game first).

Page 45 holds data on weapons, missiles and sensors but these are already filled in on the ready-made data cards. If you made your own ships these values will be calculated for you and all you must do is fill them in on a blank Datacard, this page is rarely used.

Page 46 holds tables and figures on Task determination (rolling 2D6 vs a number with a bunch of modifiers), Initiative, Movement and Sensors.

Page 47 holds tables and figures for combat, attacks, defenses etc.

Page 48 finally holds the tables and figures for Hitlocation, Penetration and Damage, Damage effects and Repairs.

Asteroids

This is straight from the rulebook page 22, at the end of the Planets section, jus before the optional rules begin on page 23.

Small asteroid
Small asteroids are at least 1 km in diameter but less than 100 km. Their mass is too low for any significant gravity, ships can Mass Scan to or from Small asteroids without penalty.
The only planetary LOS rules are for their Sun column of infinite length and their Shadow column of 1 square.

Large asteroid
Large asteroids are at least 100 km in diameter but less than 1000 km. Their Mass is high enough to forbid Mass Scans to or from them, look at the next section for gravity effects when calculating Drift in the same square as an large asteroid.
The only planetary LOS rules are for their Sun column of infinite length and their Shadow column of 5 squares.
Asteroid gravity and movement
Asteroids, large and small, behave like ships when you enter the same square as them. You cannot accidentally crash into them, asteroids cannot crash into other asteroids, but they can crash into planets but players cannot alter the vectors of asteroids their course will be predetermined from the start of the scenario.
Asteroids move as drifting ships, they have vectors, calculate Drift just as normal and ships landed on the follow along. They are also affected by gravity in the same way, to model Phobos or Deimos of Mars, just have two small asteroids in orbit around a Small planet.
Large asteroids have a small gravity field affecting their square itself. Ships that was not landed have their Drift moved into any adjacent square if the ship is Piloted, or their fwd square if unpiloted, (landed ships are never affected by gravity except being forbidden to Mass Scan). A ship is unpiloted if it has a Hull damage of Critical+, a Crew damage of Critical+ or a Thrust damage of Critical+.
Landing on asteroids work the same as for small planets; chose whether landing in the Sunside or the Darkside, see the Landed or Docked signatures and Scans on page 17.

Asteroid LOS
Asteroid LOS procedure is simpler than for planets.
Ask if the Scan touches the Sunglare column and if yes reduce the Scan by -6 (Sun). This rule always apply, even when neither planets nor asteroids are on the map.
If a Scan touches the Sun column ask if the Scan was from the Shadow column and if yes ignore any targets in the Suncolumn.
If a Scan touches the Shadow column ask if the Scan was from the Sun column and if yes ignore any targets in the Shadow column.

Special sensors
The above rules on Sunglare, Sun column, Shadow column all apply to the Visual and IR Scans, other sensors have certain restrictions.
Radar Ignores the Sunglare rules, all other above rules apply.
Neutrino Ignores all asteroid LOS rules except Sunglare.
Mass Ignore all asteroid LOS rules as well as the Sunglare rules. Mass Scans are illegal to or from large asteroids. Yes, ask if a Mass Scan was to or from a large asteroid.

Sunglare

Posted in Intercept on November 11, 2015 by Mr Backman

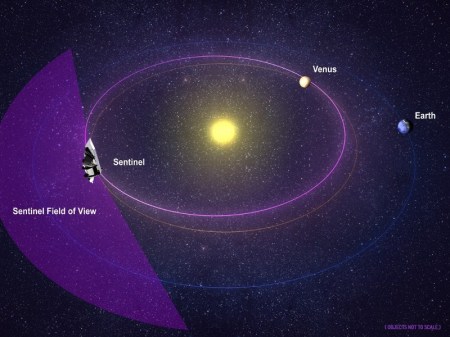
Sentinel field of view

Image credit: Bell Aerospace / B612 Foundation.

‘Keep the solar wind to your backside’, isn’t that just a clever way of explaining how to attack from out of the sun, Baron Richtofen style?

Some players, mainly my kids, have complained that the rules on Sunglare is too harsh. If your Scan touches the Sunglare column (the column of squares from your ship straight up towards the central star) is reduced in strength by -6 (or Sun factor really, but that is typically 6).

Well, it so happens that a proposed satellite to scan for asteroids have much more severe limitations on where they may Scan as the picture show. No, I promise I won’t make it any harder to Scan towards the Sun, I’ll keep it the way it is, just a friendly reminder that Intercept is actually nicer and more forgiving than the cold equations of physics. The picture is from an interesting article that you may or may not agree with, dealing with the costs and benefits of deflecting asteroids.