What is this Marre-red maneuver Sir?
It was invented by a rather colourful pirate named Mauricio Redondo way back and is used when you come out of the sun and assume your enemy is hiding in the planetary shadow. You approach the planet building up quite some speed, say 30 to 50 clicks a second, and drift as you pass above or below the planet with your powerplant off. Keep drifting ’til you think you passed the enemy then power up the reactor and start braking hard. You are now ‘south’ of your opponent facing him, in the planet shadow with your enemy to sun-ward yet no risk of any sun-blinding. Then you take him out son.
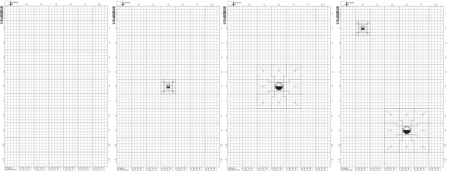
Intercept comes with a bunch of ready-made maps, empty, with a small or large planet or our beloved Earth and Luna system. Aside from the grid squares and boxes there are some features that might not be that obvious. This little post will teach you what they are and how to use them. Oh, and if anyone want a custom map with planets and asteroids give me a message here on the blog and I’ll add them.
Map coordinates
The Intercept map consist of individual squares and larger boxes, each box holding five by five squares, each box has a column letter and a row number to help identify which box you mean, individual squares within a box are numbered left to right and then top to bottom. The top left square of the top left box is A1-1-1 for example and the top right square of the third box on the second row of boxes is C3-5-1.
The top left box of each mapsheet has the columns and rows numbered for you.
Note that the rightmost column of boxes is labeled G/A and the lowest two rows are labeled 10/1 and 11/2. If you wish to play on an area larger than a single mapsheet the rightmost column form the first column of the next sheet and the lower two rows for m the first and second of the sheet below. This overlap is there to simplify maneuvering straddling the two sheets. Note that playing on more than one sheet complicates the game quite a bit so don’t do it unless you feel like it is really needed. Simply stating that ships flying outside the sheet are lost works fine too and is much simpler.
The box G/A 10/1 also has the columns and rows numbered for you, this is to help you remember that this box might be the top left box of the next sheet to the right and down.
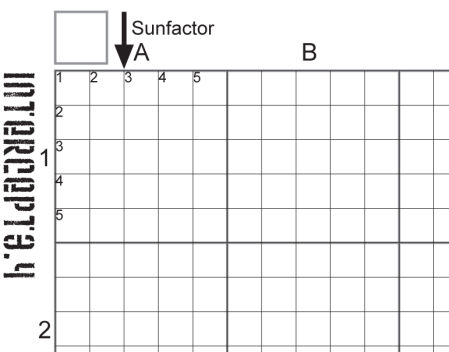
Sunfactor
The sun is always shining from the top of the mapsheet as indicated by an arrow. To the left of the arrow there’s a box where you write the actual Sunfactor used in the scenario. The Sunfactor is 6 for Earth & Luna or any planet in the biozone. Each orbit outside of the biozone and the Sunfactor goes down by 1, down to 0 and for each orbit inside the biozone increase the Sunfactor by 1, Mars is 5, Venus 7 and Mercury 8 for example. Sunfactor 9 or above will be hot enough for the ships to require special rules outside of the scope of this little blog post, stay tuned.
If you have detailed information about the star system you play in, specifically the relative luminosity of the central star (the Sun has 1.0) and the orbit radius in AU (Earth has radius 1.0) use this formula (Round to the nearest whole number but never below 0):
Sunfactor = 6 – 4 * Log10( L / R )
L = Luminosity, R = Orbit radius in AU
Turn number and A/B order
Sensor scans are done in A/B order and the final Initiative tie breaker is also done inA/B. A/B order means that side A scans first and wins initiative ties on odd turns and B on even turns. There is a row of boxes at the bottom of the mapsheet, cross them off as each turn is performed. The leftmost uncrossed box tell you if it is an A or B turn.

Fractional thrust etc)
Ships with factional thrust (1.33, 0.85 etc) can always thrust the integer part on any turn but the fractional part may give them +1 G to use on certain turns. This is shown on the ship DataCard but the information is also available in the turn number boxes (the 0.25+, 0.75+, 0.5+ values). Let’s say your ship has a thrust of 1.33, it will thrust 1 G at every turn but as 0.33 >= 0.25 it will thrust 2 G during the first turn of every four. The 0.85 G ship has less than 1 G of thrust so all of its thrust is fractional; 1G at the first, second and third turn but no thrust on the fourth turn of every block of four.
Map out your future – but do it in pencil. – Jon Bon Jovi
That’s all, stay cool, and in the shadows people.