
Do you see torpedo boats?
Kamchatka frigate of the Russian navy 1903
Missiles span everything from small 50 kg ones that are fired and either hit or miss in a single turn all the way up to 5 ton beasts that move and behave almost like a ship. Larger missiles than 5 ton should be built as unmanned ships and use the ramming rules when attacking, this is far outside of the scope of this post though. This post will only cover the small 50 kg mssiles that only last for a single turn called Snap missiles, the only ones normally allowed for Traveller characters). The rules for mssile combat is on page 12, penetration and damage on pages 14-15 and the optional Arc damage rules are on pages 38-39 in the Intercept rulebook.
Order of Actions
- Missiles are handled in the missile combat phase, which comes after beam fire in the current ship’s combat turn.
Types of Missile Launches
- Snap missiles fire immediately during the attacker’s ship combat phase.
- Regular and cruise missiles launch earlierin the missile movement step of the movement phase.
Launch requirements
- A Snap missile can only be fired if the target is within the launcher’s arc at the moment of firing. The launching crew must “see” the target in their firing arc.
- Snap missiles can only be fired if the launch position is no more than missile thrust Gs away from the target.
Missile Movement
- Once launched, Snap missiles are either shot down by the target, impact the target otr miss and run out of fuel. In all cases it is removed from play. In fact Snap missiles are never really present on the map. Regular missiles have their own movement but that is for a later blogpost.
Attack and defense resolution
- Missiles use a separate attack sequence where you calculate hit chances based on launcher/gunner skills, attack vector, target size, and other modifiers such as remaining Gs of thrust, target drifting etc. Note degree of success.
- If the target track the attacking ship it may use lasers to defend against the attack. Reduce the degree of the attack with the defense degree of success. Defensive lasers must have the missile attack position in its arc and the lasers cannot previously been used offensively. Lasers may be used defensively against every missile attack within its arc during a turn.
- If the missile survive defensive fire it must check if it penetrates the armotr at the hitlocation. Penetration of a missile is strongly affected by the attack vector. If the missile penetrates it should roll damage based on degree of succes and missile damage, also heavily affected by the attack vector.
Launch position
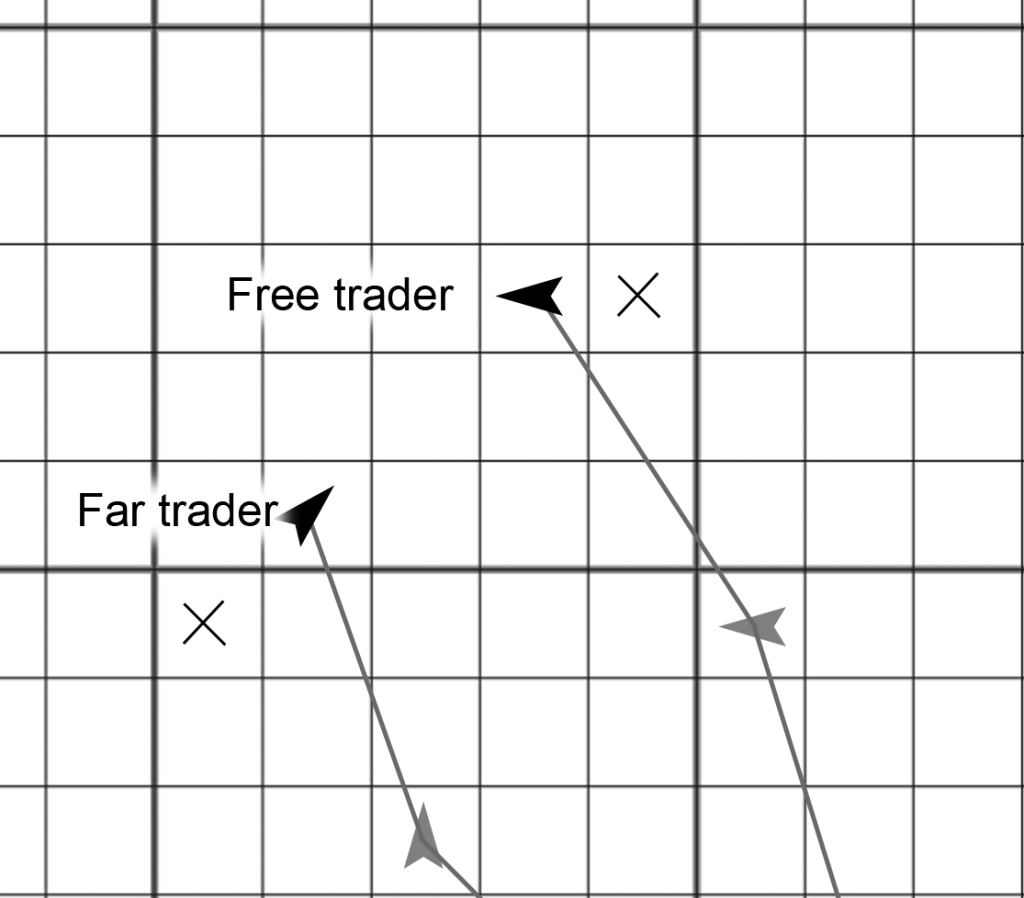
Launched missiles use the Drift position from the launching ship instead of the actual position of the launching ship. We simply assume that the missiles were launched at the start of the turn and have been thrusting during the turn free from the launching ship.
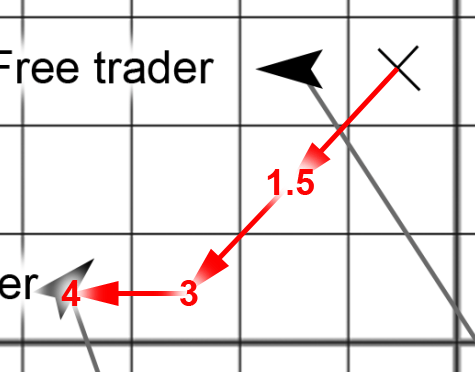
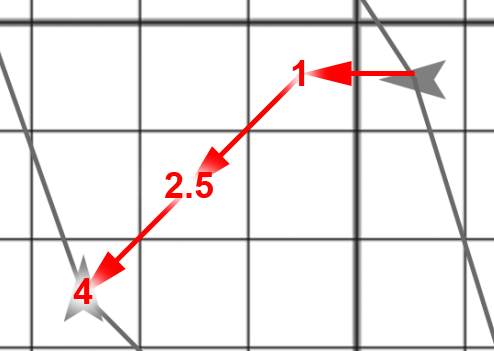
Jamisons drift is 4 squares away from Grants ship, don’t forget that diagonals count as 1.5.
Attack vector
The missiles in Intercept use kinetic energy for damage, as would any space combat missiles in the real world. This means that what relative speed the missile impacts the target affect whether it will penetrate and how much damage it delivers, it also affects the likelihood of hitting as well as the likelihood of any point defense lasers stopping it. Our friend Newton would say this will require some vector algebra but thankfully I have come up with a really nifty way of avoiding all that, hang on.
The attack vector is simply the separation the attacker and target had last turn. Think about it, the two where separated that distance the last turn and now there are at the same position therefore the two of the somehow must have closed that distance in one turn and thus we have the speed, nifty! Just by coincidence the separation from the last turn was also 4 squares. It doesn’t matter in what order you do the straights and diagonals as long as you count the diagonal 1.5, and drop any final .5 from the distance measured.
Targets in a thrusting attackers aft centerline cannot be attacked
A thursting ship has narrow arc to the rear where they are blind on all sensors and this means that the ship cannot use its lasers to defend against missile attacks originating from the aft centerline squares. Attack position here is the missile Launch position as mentioined above.
Missile attack
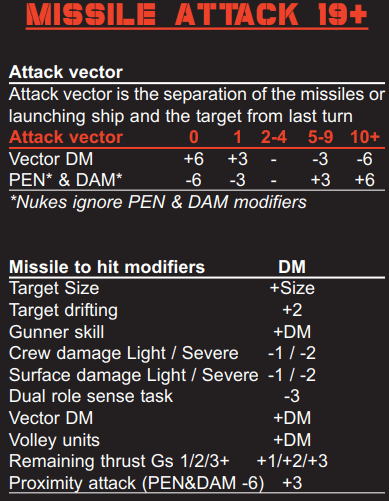
We have previously determined that the range (from Launch position to target) is 4 squares and that the attack vector also is 4 squares. The basic target number for missile attacks is a whopping 19+ but this is before we have applied the modifiers. Let’s go through each of the DMs:
Target Size
This is the most important DM, a 100 dTon ship is +8 Size as Intercept use the same Size modifiers as regular combat, a human is Size 0.
Target drifting
If the target ship is drifting it is much easier to hit and thus the +2 DM. Drifting also makes any defensive fire easier.
Gunner skill
This is simply the missile operators gunnery skill or missile skill if the rules have separate skills for that.
Crew damage Light / Severe
If the crew area has suffered damage the crew performance goes down of course, if crew damage is Critical they may not attack at all (nor defend or even pilot the ship).
Surface damage Light / Severe
Both ships weaponry and sensors are in the Surface location so their performance suffer when they take damage. If the optional Arcs damage rules are used (page 38-39 in the rulebook) each weapon or sensor has individual damage tracked.
Dual role sensor task
Naval vessels typically have dedicated crew for sensors and gunnery but merchants typically have them serving dual roles. Dual role sensor/gunner crew suffer -3 on attacking/defending if they performed a sense task prior in the turn and they suffer a -3 on sense tasks if they attacked/defended in the previous turn. Don’t skip this rule in roleplaying situations, that high skilled lone trader should have a harder time than a properly crewed ship.
Vector DM
We previously determined the Attack vector to be 4 and this will determine the Vector DM as well as modifiers to PEN and DAM if we hit. A faster relative velocity makes the target harder to hit but also has more penetration and damage as Intercept missiles (the non nuclear ones) cause damage by kinetic energy. A speed of just 1 is equal to about 10 km per second and at that relative speed each kg of the impacting missile would inflect 10 times more damage than a kg of TNT! Attack vector of 2-4 gives a Vector DM of 0.
Volley units
The number of missiles in the attack volley increase the likelihood of a hit, DMs from multiple missiles is on page 9 in the rulebook. As defensive lasers may defend against each and every volley their arc (we assune that each defensive fire takes only a small portion of the 15 minute game turn) so if multiple missiles are they to be launched it is better to group them into a volley than firing them individually. Each gunner can only fire one volley per turn so that may also limit the number of missile attacks.
Remaining thrust
The missile may hit if its thrust Gs is enough to take it from its launch position to the target ship position, any remaining Gs will help its aim with +1 per G remaining up to a maximum of +3. If the Snap missile from the images above has 5G it would get a +1 for remaining thrust.
Hitlocation
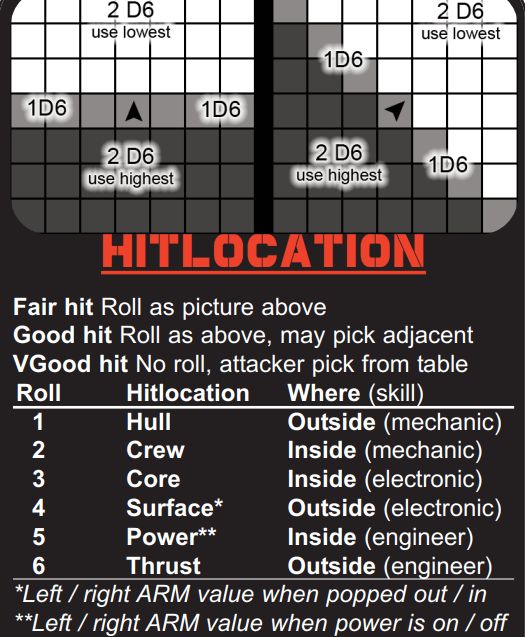
Hitlocation is based upon where the attack is coming from using the diagrams above. The Launch position is clearly in the front area sin the example o hitlocation rolls 2 D6 and picking the lowest D6. The actual hitlocation also depend on the degree of success after defense fire, Fair attacks use the hitlocation rolles, Good attacks may use the rolled one or pick any adjacent on the hitlocation table, rolling a 3 Core for example wouild let the attacker choose Crew, Core or Surface location. Very Good attacks let the attacker pick any hitlocation on the table.
Fair hits use the hitlocation rolled.
Good hits use the hitlocation rolled or the attacker may choose one adjacent to the roll.
VGood hits let you pick any hitlocation the attacker want.
Penetration
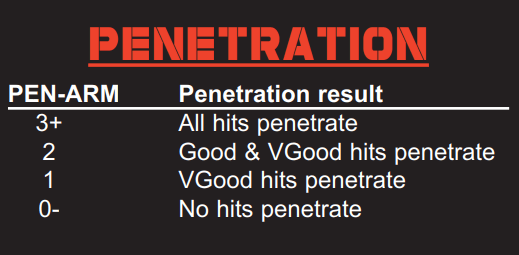
In order to score any damage the attack must penetrate the targets armor first and this is done by subtracting the mssiles PEN from the ARM of the hitlocation and looking it up. Missile PEN is heavily modified by the Attack vector, higher impact speed means better penetration and more damage. The Attack in the example is 4 which means PEN and DAM are unaffected.
Damage
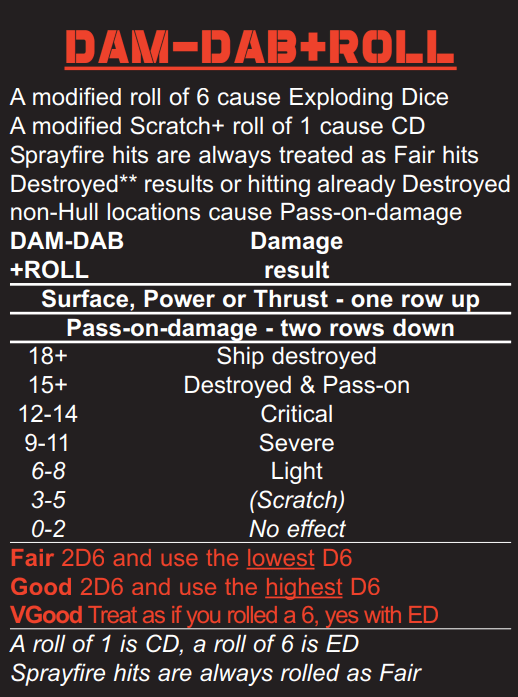
Damage is determined by subtracting the DAB of the ship from the DAM of the attack and adding a die roll that is rolled differently based on the hit task result. Look up the result on the damage table but after the degree of damage has been determined shift one row up if the hit location is Surface, Power or Thrust. If the damage is Destroyed & Pass on or you hit a location tyhat was already Destroyed or became Destroyed inflict tow rows damage on the Hull.
Fair hits roll 2D6 and use the lowest of the two, change of rolling a 6 is one in 36.
Good hits roll 2D6 and use the highest of the two, chance of rolling a 6 is 11 in 36, much better.
VGood hits don’t roll, you simply treat the result as if you rolled a 6, 36 in 36, as good as it gets.
If the result of the roll was a 6 you also roll Exploding Dice or ED for short. Roll 1D6 and add half the result rounded down, if that roll was a 6 you roll another ED dice and so on. If the result of the roll was a 1 you suffer Continuing Damage or CD for short, mark the CD checkbox on the ship paper.CD means that at the end of each turn, including this turn, by rolling 1D6 and increase damage if a 1-2 was rolled, the CD fizzles out on a roll of 6 so remove the CD check, rolling 1-5 and the CD remain. Whenever Repair Crew manages to Jury-Rig a damaged location the CD fizzles out too.
Summary
So there you go, an overly wordy description of missile combat. A brief summary would go something like this:
Lauch position Determine the missiles launch position (same as Drift position for Snap missiles). This will determine how hitlocation is determined.
Attack vector Determine the attack vector which is simply the separation between the ships from the last turn. This determines Vector DM when rolling to hit and Vector PEN & DAM modifiers if a hit was scored.
Attack roll Roll to hit and note the task result. Don’t forget the DMs from the attack vector.
Defense roll Defender if tracking the attacker may use lasers to defend, but obly if lasers haven’t already been used offensively in the turn. This defense roll reduce the degree of success of the attack, possibly down to a miss.
Hitlocation VGood hits pick hitlocation, Good roll but maybe pick adjacent and Fair attacks simply roll. How the roll is made depends on the where the launch position is versus the target.
Penetration Determine Penetration by comparing the PEN of the missikle and ARM of the hitlocation. PEN is heavily modified by the attack vector and ARM depend on hitlocation but also on wether weapons and sensors where popped out or the powerplant was running.
Damage roll Roll damage based on the degree of success. Note damage and possibly CD if a 1 was rolled.
So there, that is all there is to it, remember to watch your aft centerline and scan near yourself as missiles are deadly.
We have guided missiles and misguided men.
Martin Luther King Jr


