Archive for March, 2019

Countersheet WIP

Posted in Boardgames, Intercept on March 30, 2019 by Anders Backman

This is just a quick and dirty update on what I’m currently working on. I have just sent out some map art to be prototype printed and while I wait for those I’m working on a countersheet. The counters will be 5/8 inch double sided cardboard counters, 176 in total. Lots of fiddling in PhotoShop I can tell you.

The counters will all have black backgrounds I promise. The garish colors in the image is just borders for image bleed and safe areas, they won’t be on the countersheet itself.

Well, that is it I guess.

Han Solo aggressive docking

Posted in Films and TV, Intercept, Rules with tags , , on March 19, 2019 by Anders Backman

Han Solo aggressive docking

C3PO – “Sir, we just lost the main rear deflector shield. One more direct hit on the back quarter and we’re done for!”
Han Solo – “Turn her around!”

And then Han Solo proceed to go head to head against a Star destroyer, barely avoids crashing into the bridge and then miraculously vanishes from the Star destroyers sensors and is gone. The Star destroyer has lost them and captain Needa suffers a reprimand while Millenium Falcon has secretly docked to the enemy ship. Sure, Star Wars is space fantasy and the ships certainly doesn’t follow the laws of physics or even common sense but let’s find out if this particular daring maneuver is at all possible using the Intercept rules? We will only use the standard rules here, no house rules or Star Wars conversions, just plain ol’ Intercept.

Let’s use a Beowulf class Free trader as Millenium Falcon and an Azhanti High lightning class cruiser as the Star destroyer. Let’s break down what is going on in the scene:

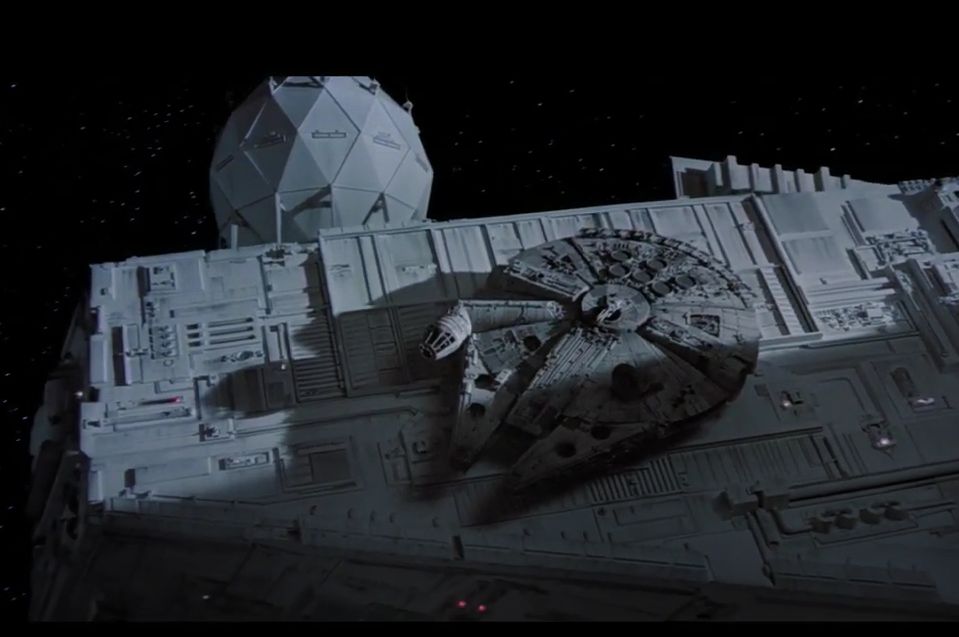
Han, Leia and Chewie hastily exit the asteroid to avoid being eaten by a huge improbable worm. A nearby Star destroyer detects them and give chase. Falcon first seem to shrug of the fire from the enemy but then a hit destroys their rear deflector shield. Han reroutes all power to the forward deflector shield, turns around and fly straight at the enemy. Captain Piett order shields up as Falcon barely misses them. The Star destroyer has lost track of the Falcon and assume it has escaped, possibly through some sort of cloaking device albeit a ship that small is unlikely to have one. Falcon has in fact docked on the rear side of the Star destroyers bridge tower.

Top and bottom arcs

Intercept neither have shields nor cloaking devices, the only defense against lasers aside from armor is sandcasters so let’s assume our trader ship has a bunch of these; one laser and two sandcasters in the top turret and one laser and two sandcasters in the bottom turret. The Beowulf won’t ever fire at the Azhanti but we calculate it anyways:

  • Beowulf Pilot task 7+, +4 from Hand Solo being an excellent Pilot
  • Dice pool 1
  • Thrust 1.8 Gs unloaded
  • DAB 20, ARM 19, Surface 13/19, Power 16/19, Thrust 16
  • Effective Range 1 Single 10 MW laser: PEN 24 DAM 24
  • Beams 5+ range 1, 8+ range 2-3, 11+ range 4+, Missiles 8+
  • Two sandcasters defense roll 9+, +2 for dual

The Azhanti has lots of weaponry including the deadly meson spinal mount. Darth Vader wants to capture the ship rather than killing it as he believes Luke is on board. The Azhanti will use its two batteries of 10 MW lasers each and its two batteries of 50 MW each. The Azhanti will also use Spray fire attacks to trade damage for multiple hits hoping to cripple rather than killing, most commanders know what awaits if one displeases Darth Vader.

  • Azhanti Pilot task 12+
  • Dice pool 7
  • Thrust 2.3 Gs loaded
  • DAB 35, ARM 31, Surface 25/31, Power 25/31, Thrust 28
  • Range 1 Triple 10 MW laser: PEN 25 DAM 25
  • Range 3 Single 50 MW laser: PEN 29 DAM 29
  • Beams 0+ range 1, 3+ range 2-3, 6+ range 4+, Missiles 3+
  • No sandcasters

Top and bottom arcs 2

We will simply assume that Han Solo with his excellent piloting skills and a target number of 7 will always be able to turn at least 4 steps (which is the same as saying he will roll 3+ on his Pilot task rolls). We also assume that the cruiser will use many of its computer pool dice to get 2 steps of turning on every turn. Given the fact that when Han Solo initially escaped from Hoth and was chased into the asteroid belt his fancy flying had two cruisers nearly crashing. Surely lord Vader will have none of that so the cruiser captains make damned sure that maneuvering is a top priority.

The trader is leaving the asteroid with a speed of 2 and the Azhanti has the same speed, two squares behind and one to the right. The cruiser immediately give chase and the fight is on.

The cruiser fires its lasers at the trader and the trader defends using the two sandcasters of its belly turret. The sandcasters does not completely stop the laser attack and the cruiser inflicts Severe damage to the Surface location of the trader.

This is the moment C3PO say “Sir, we just lost the main rear deflector shield. One more direct hit on the back quarter and we’re done for!”

The cruiser know the trader is now nearly defenseless and confidently turn and thrust to close the gap.

The trader captain knows he can no longer rely on the sandcasters fending off the cruisers lasers and he cannot outrun the cruiser as the trader’s 1.8 Gs is no match against the 2.3 Gs of the cruiser. He decides to turn the ship around and go for the cruiser’s blind aft centerline. C3PO shouts in protest and Needa flinches as the trader passes the bridge of the cruiser.

The trader disappear from the cruiser’s sensors as it has moved into its blind aft centerline. The next turn the cruiser will no longer learn the trader’s move. It is crucial that the cruiser reacquires the trader or the trader might slip away. Failure is not an option when Darth Vader is your commander.

The captain uses the formidable computer power at hand to turn the cruiser 2 left and thrusts for 2G, turning the cruisers blind aft centerline away from where he thinks the trader will go. The trader decides to capitalize on the cruiser being blind by turning towards the cruiser and thrusts to get on top of it.

What is Han Solo thinking, surely the cruiser will have the common sense of scanning itself when the enemy has lost its track?

The movement phase is over and its time for the Sensor phase. Having lost the track of the trader the cruiser should perhaps go for a wide scan that is guaranteed to contain the trader, a Visual or Infrared 2×2 box Scan maybe?

Every sensor operator and every officer at the naval academy learns that Scans touching the Sunglare column are bad, akin to staring into the sun on guard duty. Sure, Hoth lies outside of the Goldilock zone of its star and the asteroid belt is even further out it will still severely degrade the Scan, what else to do?

The best option might be for the commander to put a small 3×3 square Radar scan on the ship. Radar don’t suffer Sunglare degrading and will make sure the trader cannot hide anywhere near the ship. We who have seen the movie knows this is not what happened – Leia and Han was not captured and brought to Vader’s command ship so why didn’t captain Needa use a radar scan to reacquire the trader?

Captain Needa, after losing track of the trader “I shall assume full responsibility in eluding them apologize to lord Vader – meanwhile, continue to scan the area”

The reason is simple; as Needa has left to ‘apologize’ to Vader the remaining bridge crew on the cruiser does not want to signal to Vader that they have lost track of the prey. Vader’s command ship will surely pick up the radar scan of the cruiser and inform lord Vader of their incompetence.

The cruiser decides on a Visual 1×1 box scan that doesn’t touch the Sunglare and covers the presumed location of the trader.

The cruiser sees nothing and it’s remaining bridge crew learn the fate of captain Needa, failure is not an option in tbe Imperial navy it seems. It is time for the next turn.

Finding nothing from the previous turn’s Scan the cruiser turns left and thrusts for 1G. Han Solo, still untracked, executes the final step in his clever gamble and manuvers to dock with the cruiser (same, position, vector and facing is all that is required).

The trader is now docked with the cruiser and the only way a Scan to detect it is if the scanner explicitly states that they are scanning for docked ships, with their Sense target number up to 7+ from the usual 6+. See page 26 of the rulebook for details on Landed or docked.

C3PO “Captain Solo, this time you have gone too far!”

The trader ship will remain docked until the fleet get ready to jump. Very few people have ever heard about this trick; to dock unseen with an enemy vessel to elude detection, unfortunately for Han Solo, one of these few is Boba Fett who follow them as they undock.

So, there you have it: playing out the escape from the Hoth system using only standard Intercept rules, even finding rationales as to why captain Needa does what he does.

Keep space tidy – dump in jump.

Sensor rules part 2

Posted in Intercept on March 9, 2019 by Anders Backman

What is this Marre-red maneuver Sir?

It was invented by a rather colourful pirate called Mauricius Redondo way back and is used when you come out of the sun and assume your enemy is hiding in the planetary shadow. You approach the planet building up quite some speed, say 30 to 50 klicks a second, and drift as you pass above or below the planet with your powerplant off. Keep drifting ’til you think you passed the enemy the power up the reactor and start braking. You are now ‘south’ of your opponent, in the planet shadow with your enemy to sun-ward yet no risk of any sun-blinding. Then you take him out son.

Sensors part 1 skipped the rules on how planets and asteroids may affect scans, this post is going to remedy that, first with the actual rules and then some examples on how this work in practice. The following blog posts deal with the the different sensor types and how to avoid being detected by them.

Planet Line Of Sight (LOS)

Planets block line of sight, it’s quite obvious; just look down at the ground at night and notice that you cannot see any stars.

Ships far from a planet cannot see targets on the opposite side of the planet if they are near the planet. Ships near a planet cannot see targets on the opposite side of the planet, regardless of how far they are, and ships scanning for targets near a planet cannot see targets if they are opposite the planet regardless of how far away they are.

Planets and asteroid columns

Shadow column

Planets cast long shadows where ships can hide. The column below a planet, 1 square wide for Small planets, 3 squares wide for Large planets, is called the Shadow column. Ships and missiles in the Shadow column treat the Sunfactor as 0 instead of its normal value (usually 6), no other signatures are affected by planetary shadows. Ships in shadow also ignore Sunglare.

Planet LOS sectors

Planets also block Line Of Sight (LOS) of course, ships on one side of the planet won’t see and won’t be seen by ships on the other side. Planets have sectors that delineate who can see whom, near sectors that are simply the 8 arcs of the gravity well, and far sectors that extend the gravity arc all the way out to the edge of the map. If your ship is inside a gravity well the opposite near & far sector are blocked. If your ship is outside of the gravity well but your scan touches the gravity well the opposite near sector is blocked. Planet LOS is symmetric so a ship cannot see a someone that cannot also seem them. Look at the pictures for the near and far sectors of planets, small and large.

So, how does this work in practice? The scanner has placed a Scan somewhere and it’s up to the target, to make sure it is a legit Scan. This is done by the target asking the scanner a few simple questions and act upon the answers.

Does the Scan touch your ships Sunglare?

  • Ships in shadow ignore Sunglare

If the scan touches your Sunglare column and you are not in shadow you say yes and reduce the scan strength of your scan by Sunfactor (typically 6). If the scan does not touch your Sunglare column or your ship is in shadow you answer no and leave the scan as it was. This question is always asked.

Does a planet block parts of your Scan?

  • If scanner and scan is outside of gravity ignore Planet LOS
  • Near sector block opposite near and far sectors
  • Far sector block opposite near sector only

Your opponent now asks you if the planet blocks part of your scan.

If your ship is inside the gravity well (a near sector) the opposite near and far sectors are blocked. If your scan touches any of the blocked sectors you must tell your opponent what is blocked of the scan, if your scan doesn’t touch the blocked sectors you tell him nothing.

If your ship is in a far sector the opposite near sector only is blocked. If your scan touches that blocked sector you must tell your opponent what is blocked, if your scan doesn’t touch the sector you tell him nothing.

Planetary LOS examples

The scanner simply places his Scan somewhere calculates its strength based on Sensor + Scan modifiers. The target of the Scan then ask a series of questions which may lower the Scan or make certain parts of it ignored. Scans are done in reverse Initiative order.

Scan 1

A has his ship located in 1 and decides to do a 1 box Scan in box B4. His Sensor is +2 and the scan modifier for a 1 box scan is -1.
Player A ”I have a visual scan, strength +1, one box large, in box B4.”
Player B ”Does your Scan touch your ships Sunglare column?”
Player A ”Yes, my Scan touches my Sunglare, dammit!”
Player B ”Is your scan from or does it touch a gravity well?”
Player A ”No, it’s not from gravity and you can see it doesn’t touch it”
The scanner grudgingly admits that the Scan does touch his Sunglare column so the target reduce his Scan strength by -6 to an abysmal -5. If the target was not inside the Scan he would say Nothing, if inside the Scan but with a Signal of -1 the target would still say Nothing, if the Signal was 0+ it would be a Contact so the target would tell its position and what Signature(s) that gave 0+ Signal, the scanner would then probably do a Sense task to try to get a Tracked result on the target. The target player has also learned that the scanner’s ship is somewhere below the Scan, thank’s to the Sunglare.


I have colored the entire Scan 1 orange because of the Sunglare strength reduction, the Scan is still valid but very weak. Don’t stare into the sun.

Scan 2

Player A has moved his ship into position 2 and decide to do a huge 3×3 box scan centered around E1. The scan modifier for a 3×3 scan is -3 so his with his +2 Sensor the Scan strength is -1.
Player A ”I have a Visual Scan strength -1 three by three boxes in box E1.”
Player B ”Does your Scan touch your ships Sunglare column?”
Player A ”No it doesn’t. I have learned my lesson”
Player B ”Is your scan from or does it touch a gravity well?”
Player A ”Eh, yes it is”
Player B ”OK does the planet block any of your scan, what sectors if so?”
Player A ”The northeast near and far sector”
The northeast near and far sector is colored gray in the pictures. If player B had any ships or missiles inside the parts of the scan inside northeast near and far those targets would have been ignored. The near is simply the gravity sector and far extends from that forever. The Scan touches the Sun column but as player A wasn’t scanning from the Shadow column this had no effect.

I have colored the parts of the scan that should be ignored in red.

Scan 3

Player A has drifted into position 3 with the help of gravity. He decides to do a 3×3 box Scan in E4. He figures the Shadow column will protects him from Sunglare. The Scan strength is -1.
Player A ”Visual Scan strength -1 three by three boxes in E4.”
Player B ”Does your Scan touch your ships Sunglare column?”
Player A ”No”
Player B ”Is your scan from or does it touch a gravity well?”
Player A ”Not from within, but it touches”
Player B ”OK does the planet block any of your scan, what near sector if so?”
Player A ”Near north”
The scan touches the Sunglare column but as the ship is in shadows the answer is no. The near north sector will be ignored but most of the Scan is still valid as you can see. Had his scanning ship been 3 squares to the right none of the Scan would be blocked,had the ship been one square further up it would be in the near sector (gravity well) so the entire opposite arc would be blocked, all the way to the top of the map.

I have colored the parts of the scan that should be ignored in red.

What about asteroids?

Asteroids cast shadows so you can reduce your Visual(Hull) by staying in their shadows and by staying in their shadows you may also ignore Sunglare. Asteroids are too small to offer Planet LOS blocking however but there is still a way to get LOS blocking from an asteroid; land on them. See page 26 in the rulebook.

What about shadowing?

There is this obscure trick where a ship with the same position, vector and facing of a larger ship lies in its shadow so it treats the Sunfactor as 0. This is called shadowing and and can be done with friendly ships as well as enemies. Sunglare does still apply when being in shadows this way however. Shadowing enemy vessels is a good way to stay undetected as ships rarely scan their own position.

Be cool and stay in the shadows until next time, over and out.