We don’t experience the world directly. Our senses react to certain physical phenomenon and our brains interpret the data and paints us a picture that feels both real and coherent, the world is a fantasy of our creation. The sensors of your ship is just one more redirection from the universe and your mind.
3 worked Scan examples
The rulebook tell us how a Scan is performed. The scanner adds his sensors Sensitivity to the Scan size modifier to get a Scan strength. The Scan strength together with type of sensor, position and size is presented to the opponent. The opponent then, ask three questions and the answers determine if the Scan strength should be reduced or if there are areas of the Scan that cannot be seen by the scanner and should therefore be ignored.
If the opponent has target(s) inside the legit area he will add the relevant Signature(s) to the Scan strength and if the result, the Signal, is 0+ he must tell the scanner each relevant Signal that was 0+. The Scanner finally decides whether to perform a Sensor task and that task will give him an Indication, a Contact or the much coveted Tracked result. Read pages 6-7 for the basics and page 18 for planets and page 22 for asteroids and there respective effects on scans. End of story, right? Below follow three scan examples, with pictures and all, enjoy.
Scan 1
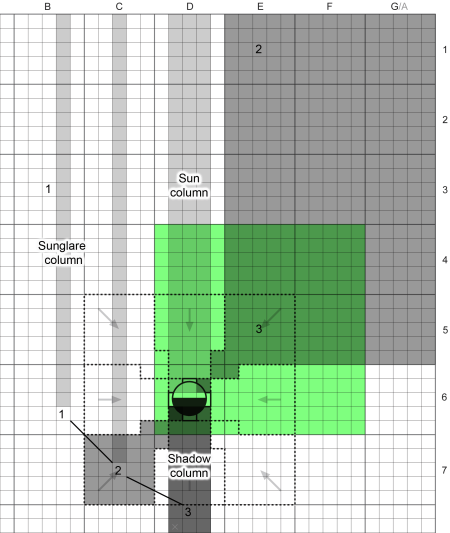
The player A, the scanner, decides to try a 1×1 box towards the sun to see if the sneaky player B is maybe approaching from the sun. The ship is where number 1 is located and the green area is the Scan. The ship has a +2 Sensitivity Visual/IR sensor, and the modifier for a 1×1 box is -1 so Scan strength is +1.

Scan 1 – Visual 1×1 box, strength +1 in B3
Player A “I will do a Visual Scan, 1×1 box, with a strength of +1, in B4”
Player B “Does the Scan touch your ships Sunglare column?”
Player B starts asking the three questions, this one is from page 6 in the rulebook, the other two are from page 18. The Sunglare question must always be asked, even if there are no planets or asteroids on the map.
Player A “Yes, my Scan touches my Sunglare goddamit!”
Player B “Does your Scan touch a blocked sun or shadow column?”
This question need only be asked if the map has planets or asteroids on it.
Player A “No, and you can clearly see that I don’t, but I know, you have to ask”
As the Scan didn’t touch the sun or shadow columns of the planet this question is not strictly needed but it can be good practice to ask all three questions regardless. The Sun column is the three squares wide light grey column above the planet and the Shadow column is the three squares wide darker grey column below the planet. Large planets have three squares wide Sun and Shadow columns, small planets and asteroids have one square wide, planets have columns infinitely long while asteroids have columns limited in length, see page 18 and 22 for details.
Player B “Finally, does the planet block parts of your Scan?”
Player A “Eh, wait a minute, checking…, ah nope”
The Scan is neither from nor to the planets gravity-well so player A can can swiftly answer this with a resolute ‘no’ but sometimes taking longer to check can fool the opponent into believing you are somewhere else.
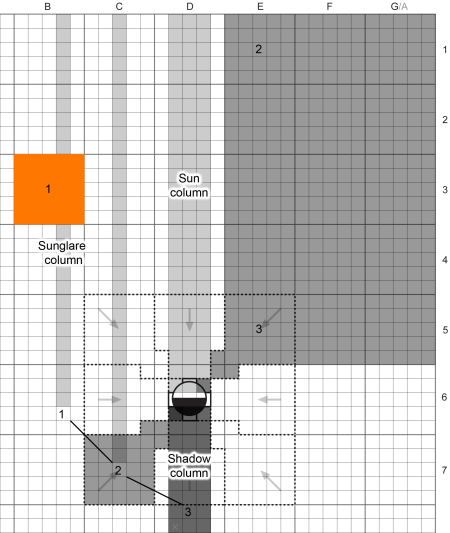
Scan 1 – Sunglare always affect none or the whole Scan, never parts
The one square wide column extending up from the scanners ship, not including the square of the ship itself, in grey, is its Sunglare column. Any Scan touching the Sunglare column will have its Strength reduced by the Sun factor (from now on called simply Sun). The Sun factor is normally 6 so in this case the Scan strength goes from +1 to -5.
If player B has any ships inside the B4 box he must now add the Scan strength of -5 to all his ship’s or missile’s Visual signatures, always Visual(Hull) and Visual(Thrust) too but only if thrusting. If the Signal (the Scan strength plus Signature) is 0+ he must tell player A that he got an Indication at least, and tell him the actual Signal(s). Player A may now rolls a Sensor task to determine if the Signal was high enough to also give him a Contact or the coveted Tracked result.
Player A have hopefully learned that Scans containing your scanning ships Sunglare column are stupid, the space combat equivalent of staring straight into the sun.
Scan 2
Player A now has his ship in position 2 and is about to declare his second Scan. This time he tries a larger 3×3 box one well away from his Sunglare. Note that parts of the Scan is outside of the map, which is perfectly fine as long as the center is still inside. Ships and missiles outside of the map are lost but Scans partly outside are simply a bit wasteful.
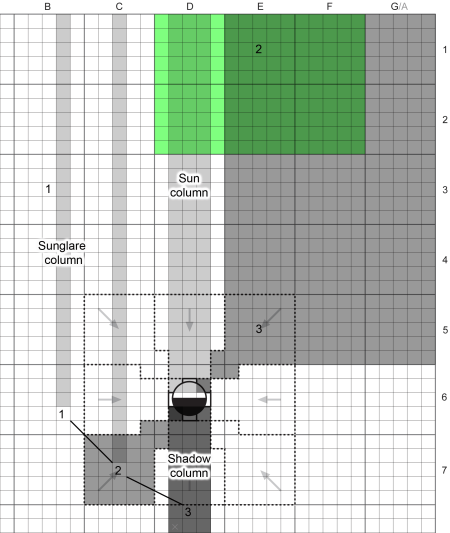
Scan 2 – A Visual 3×3 boxes Scan with Strength -1 in E1
Player A “This time I do a Visual Scan, 3×3 boxes, with a strength of +1, in E1”
Player B “Does the Scan touch your ships Sunglare column? You do know that parts of your Scan is off the map right?”
Player A “Yes I know and no, this time my Scan does not touch the Sunglare column of my ship”
The grey one square column stretching up above position 2 is the ship’s new position and we can clearly see that the new Scan doesn’t touch it, no Sunglare reduction this time.
Player B “Does your Scan touch a blocked sun or shadow column?”
Player B can clearly see that the planet’s Sun column is touched by the Scan but even if it didn’t it might be a good idea to ask this question, just to get into the habit.
Player A “Yes,the Scan touches the Sun column, but no, my ship is not in the Shadow column”
If the Scan touches the Sun or Shadow column the scanner must tell his opponent whether his scanning ship is in the opposite column or not. Whenever a Scan has the potential of having areas blocked they will also tell the target something about the scanners location.
Player B “Does the planet block parts of your Scan?”
Only omit this question if there is no planet on the map. If the Scan is from within he gravity well of a planet or if th Scan touches the gravity well of a planet, parts may be blocked. Planets have 8 sectors around them, near sectors inside the gravity well and far sectors extending infinitely far out. Pictures on page 18 show you the sectors of small and large planets. If your Scan doesn’t touch any blocked sectors you must still tell your opponents this, that nothing of the Scan is blocked.
Scans from a Near sector blocks the opposite near and far sectors.
Scan from Far sector blocks opposite near sector only.
Player A “Yes, my Scan is blocked in the planet’s North-East near and far sectors”
If player B has any ships or missiles in the North-East near or far sectors they should be ignored, any targets in the boxes D1 and D2 are still valid of course. Player B also now knows that player A has his scanning ship inside the South-West near sector. This is why the order of Scans are important, players take turns scanning first or last using the A/B turn order rule as explained on page 2 of the rulebook.
Scan 2 – Parts of the Scan blocked by the North-East near and far sectors.
Scan 3
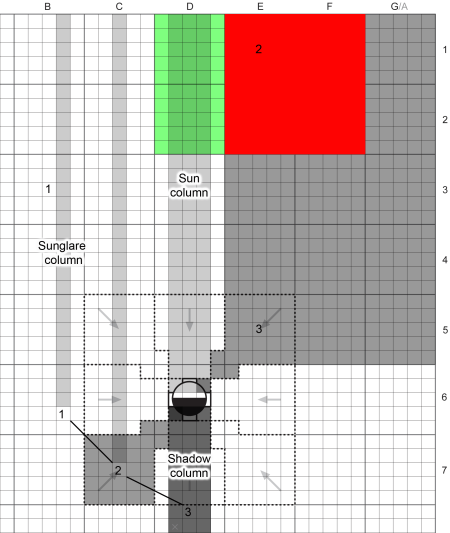
Turn 3 has player A’s ship just outside of the gravity well of the planet, and well inside the planets Shadow column. Being inside the Shadow column not only block scanned targets in the Sun column it also reduces the Visual(Hull) Signature. Normally, in sunlight, the Visual(Hull) uses the number written +Sun but when the ship is inside the Shadow column the Sun factor is 0 making the ship much harder to detect.
This time player A decides to Scan near the planet, thinking player B is maybe lurking there, inside the gravity well. A 3×3 Visual with a Scan strength of -1, centered in E5, as shown by the grey area.
Scan 3 – Visual 3×3 boxes, strength -1 in E5
Player A “OK, another Visual Scan, 3×3 boxes, with a strength of +1, this time in E5”
Player A once again ask the only question one must always ask, the one about scanning the Sunglare. If you look at the figure it might look like the S´can really is touching the shops Sunglare, it is – but – if a ship is in the Shadow column they are unaffected by Sunglare! Go outside in the middle of the night, stare straight down – do you feel blinded by the sun? No, didn’t think so, the Earth was in the way, you were technically in Earth’s Shadow column and thus unaffected by Sunglare, and if´you were away from streetlights and such, I bet your body was harder to see too.
Ships in the Shadow column are unaffected by Sunglare
Player B “Does the Scan touch your ships Sunglare column?”
Player A “No”
Player A doesn’t have to tell player B that the reason Sunglare isn’t in effect is because he is in the Shadow column. Don’t reveal what you don’t have to.
Player B “Does your Scan touch a blocked sun or shadow column?”
As the Scan touches both the Sun column and the Shadow column of the planet player A must reveal if he is any of them or outside both.
Player A “Sigh, my ship is in the Shadow column, the Sun column is blocked”
Player B “Aha! That explains why Sunglare didn’t affect you. I think I know where you are now!”
Player B “Does the planet block parts of your Scan?”
Player A “Yeah, my Scan is blocked in the North near sector, and the Sun column too as you already know”
Boxes D4 and D5 have small parts that are not blocked but most are, but still, big chunks of the SCan are still valid, don’t be afraid to do Scans including the planet, trick players tend to stay close to the planet thinking they’ll be blocked but as you can see that is far from the truth.

Scan 3 – Sun column and North near sector are blocked, shown in red here.
Page 16 to 22 of the rulebook covers everything you need to know about planets and asteroids, not only how they affect Scans but how you land on them, how their gravity affect your movement, how you can use their atmosphere for aerobrake maneuvers, and even how your Scans and Signatres are affected by being landed on a planet or asteroid.
Smugglers do it in the shadows – faded text on a dead captains T-shirt.