Knowing the sensor rules well will probably win you more battles than any other part of these rules, it is also what sets Intercept apart from other space combat games as it allows double-blind movement without a referee.
Using sensors resembles the old game Battleship; choose an area on the map to scan and if an enemy have targets there they may become detected. Larger scans mean lower sensitivity so if you search too large an area the enemy may go undetected despite being inside the area you scanned.
First, a brief summary of the Sensors phase of Intercept
- Scans The scanner decides on up to two areas to scan and determine the scan strength of each, this is revealed to the target.
- Questions The target ask questions about the scans that may reduce scan strength or ignore parts of the scans.
- Signal The target determine the signal by adding his ships signature to the scan strength for each ship or missile volley inside the scan area. Target reveal any signals (signature + scan strength) that are 0 or higher.
- Sense roll If the scan got at least one signal that was 0 or better the scanner may roll a Sense task trying you get a Tracked result on the target. Only one Sense roll is done and is used for all 0+ signals.
Sequence of play and procedure
Sensor scans are done one side at a time in A / B order, each side is allowed up to two scans. A / B order means that side A scans first on odd turns and B on even turns. There is a row of boxes at the bottom of the mapsheet, cross them off as each turn is performed. The leftmost uncrossed box tell you if it is an A or B turn (A means player A win Initiative ties and scans first, B means the same for player B).
The procedure is similar to the game Battleships, the scanner selects an area to scan and the opposing player, the target, reveal what’s there if anything. It’s a bit more complicated than that of course but it’s basically the same.

Scans
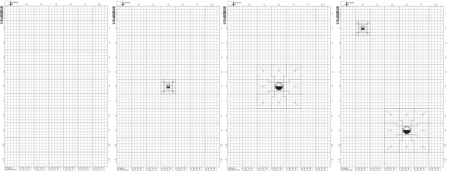
The scanner decide on a square area on the map, from a single square to 5 by 5 boxes (25 x 25 squares) covering most of a map. The area does not have to be all on the map and it doesn’t matter if the scan includes planets or asteroids, at least not yet.
Tell the opponent what scan type (Visual, IR, Radar, Neutrino or Mass), and the area of your scan (top left and bottom right corners) and show on the common map. Determine the scan strength by adding your sensors strength with the scan size modifier. Note that radar and mass scan use different scan size modifiers. Tell your opponent, the target the strength of your scan.
Note that a smaller scan area gives a higher scan strength and thus a greater likelihood of detecting whatever is inside the scan area while a larger scan area and thus a lower strength will be more likely to have something inside them.
Each scan size has a maximum range which the entire scan must lie inside, larger scans have larger maximum ranges, maximum range is always five times the scan size. A 3×3 square scan has a max range of 15 squares or 3 boxes, a 2×2 box scan (10 by 10 squares) has a range of 50 squares or 10 boxes and so forth.

All parts of the scan must be within 5 times the size of the scan.

Questions
After the scanner has declared both of his scans it is time for the target to handle the scans, one at a time.
The target will ask a couple of questions that may reduce the strength of the scan or have parts of the scan area invalid.
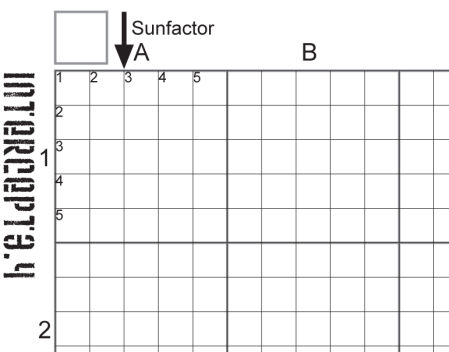
Does the scan touch your ships Sunglare?
If the ship is in sunshine and your scan touches a one square thick column extending from the square just above your ship all the way towards the sun. If that is the case you answer yes and the scan strength is reduced by the Sunfactor, typically 6 is subtracted. This is the detrimental effect of your sensor looking directly at the sun.
Do not answer yes if the scan is radar or mass or if your ship is in planetary shadow (ships are never considered in planetary shadow against neutrino scans). Note that the Sunglare column does not contain your ship itself, only the column above it all the way to the top edge of the map.
Radar and mass scans ignore Sunglare questions, skip this question when using them.

There are more questions to be asked by the target to the scanner if the map has planets or asteroids on it but it will do for now. Sensor rules part 2 will handle Sun/Shadow columns and planet LOS in detail.
Signal
Signal is what you actually end up seeing on your screens; Nothing, Contact position or a fully Tracked target good enough to shoot at. Normally you perform a Sense roll to determine what you get but if the Signal is 12 or higher you automatically get a Tracked result, no Sense roll is needed for that.
Nothing Signal of -1 or lower. The target don’t tell you anything at all, not even if anything was there or not, nothing is nothing.
Contact Signal of 0-11. Target tells you all 0+ Signatures; the Signature value and the type, Visual(Hull) or Visual(Thrust) for Visual scan for example. Roll a Sense task to determine if you got a Tracked result.
Tracked means the target tell you everything about its ship, its position, vector, facing, if it has rolled etc. Target also tell you damage status, and all capabilities of the ship, basically everything on the datacard. Tracked ships move in the open on the common map before any untracked ships. Tracked status remain from turn to turn with no need for new Scans. Tracked ships launching missiles or ships will have them tracked too.
Sense roll
If the target tell you that you got a 0+ Signal the scan has given you something, you know something is there and all Signature(s) that gave 0+ Signal. Roll a Sense task to try to get a Position or a Tracked result.

Lost Tracking
A ship can lose track of a target under certain circumstances. Losing track means the target goes back to hidden movement and the tracker need to re-track the ship again in order to attack or defend against it. Every ships that can track must lose tracking for tracking to be lost, we simply assume that all ships of a side share tracking data between them. The reasons for Lost tracking are the following:
- Target in the aft centerline of a tracker that is thrusting
- Popped in loses all tracked targets* and all launched missiles.
- Target blocked from tracker by planetary LOS
- Tracker has Surface** location Critical+ damaged or Surface** has Stun
- Tracker has crew Critical+ damaged or Crew is stunned
- Target beyond max range as given by the Max tracked table in the rulebook.
*Popped in has no effect on Neutrino or Mass sensor tracks
**Core location for Neutrino or Mass sensors
Tips and tricks
The following blog posts deal with the the different sensor types and how to avoid being detected by them.