Archive for the Design system Category

Ready made ship designs

Posted in Design system, Intercept, Traveller on April 15, 2010 by Mr Backman

Hopefully, some of you have had time to fiddle around with the design system but judging from the lack of questions in the chat I kind of doubt that. I have whipped together some designs of popular ships in the Traveller universe, you can download them here, they have been updated 2010-05-31.

They are all made with the 1dTon = 5 m3 option so you may have to convert them to regular dTons. Simply edit the values of all dark yellow cells as follows:

  • Change the topleft cell to read 14 or whatever value the dTon is in your version of Traveller.
  • Divide the hull volume value by 5.
  • Divide the powerplant output by 25.
  • Divide the cargo volume and hangar volume by 5.
  • Divide the living space by 5.

The ship designs were quickly made and especially the Azhanti may need some serious rethinking. I have written down some notes for each design so you understand why the look as they do.

Azhanti This ship was just whipped out and it has never been playtested. It requires way too much technicians compared to canon and you may have to add robots to reduce the crew to something more reasonable. Consider the design as a starting point for your own version.

Cutter This is a 50 dTon design with 25 dTon modules. It can do 2G loaded and nearly 3.5 Gs unloaded. The cutter is sometimes used for interplanetary missions so I added large crew stations and enough living area for a cramped one week tour. The cutter has a small turret and that can be fitted with up to 1 m3 weaponry if needed. The fuel scoops allow it to use fuel modules without the need for each and every one of them needing fuel scoops.

Donosev The Donosev is interesting because it has such a vast array of sensors, I gave it every kind of sensor there is and the Visual/IR is huge, with as Scan of +5.

Launch This is the launch for the subsidized merchant. It has only a 1G floater to keep the power requirements to a minimum. It uses its 2G fusion drive for thrusting with enough fuel for 30 GTurns, it has fuel scoops so its fusion drive can cut down on fuel consumption and radioactive exhaust by running in airbreather mode while inside an atmosphere. I gave it a small turret so it can be armed if needed. My youngest daughter has one of these with a missile launcher and IMTU no one has ever heard of an armed Launch so it has seen a fair amount of space battles.

Subsidized merchant I always wondered why it had wings when it obviously (from Keith drawings) also had at least a floater. I figured that the floater was only capable of lifting the ship unloaded. Fully loaded it needs an atmosphere to take off and enough runway to reach its 161 km/h stallspeed. The fusion drive works in airbreather mode when inside an atmosphere to cut down on fuel and to cool the exhaust. The fusion drive has only 10 GTurns of fuel and this should be enough for planet to -> jump point and jump point to -> planet, the reaction mass might need adjusting upwards. I think the oldtimer in Pilot’s handbook that never trusted subs crews was wrong; they are better spacers than any of those lazy reactionless drive softies.

Suleiman scout There is not much to say there really as it has been extensively covered in the DIY starship 1 – 4. Probably the best player ship in Traveller, in my humble opinion.

SDB Burgund The SDB has extreme stealth against Visual/IR, can take a lot of pounding on hits thick hull and can dish out missiles forever. It lacks any kind of stealth against radar, neutrino and mass sensors. The captain is supposed to run popped in, drifting with floorfield off and powerplant on idle. It takes a special kind of person to crew an SDB, more like submarine crews than surface Navy.

Rampart fighter This is also just a quick sketch. The attack tactic is to come at the target with good speed, launch the missiles and as the fighter drifts the pilot/gunner steers the missiles onto the target with enough relative vector to gain that bonus on PEN and DAM, Rocketpunk manifesto calls these kind of fighters for Lancers.  Fighter pilots know they will be eaten for breakfast in a real war with the Zhodani so the Navy give so slack while on base. 45 % of mess brawls are started by fighter pilots.

Well, at least I have given you some ideas on how to do Traveller designs in the Intercept design system. If you want an interesting match I suggest pitting a subsidized merchant with an armed launch against a single Suleiman to see how that fares. The Suleiman has a huge tech advantage but the little launch can spin circles around the scout and the trader can soak up quite a lot of damage due to its bulk.

8 minutes to the sun – is space too big or lightspeed too slow, or both?
DIY starship part 4

Posted in Design system, Intercept on April 13, 2010 by Mr Backman

This is the final installment of the Intercept design system tutorial, you can get the files you need here (updated 2010-08-01).

Well, we are done with the design work for our Suleiman class Scout/Courier, lets see what game stats it got and what they mean. Eventually we will fill in one of those DataCards for the ship so it can be used in Intercept.

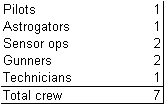
Crew requirements

There is a table that lists crew requirements for your ship located to the right. All crew members except technicians need crew stations to function. There is some leeway for crew on smaller ships, especially if they are civilian in nature. A ship can get by with just one sensor operator as long as it never performs more than one scan per turn (Intercept has a rule that says each side can only do two scans per turn, they must be of a unique types for a single ship and the Visual/IR cannot both be used from the same ship, only one scan per sensor op however.

Sensor ops can double as gunnery crew but then the ship may not use sensors (aside from maintaining tracks) if the ship attacked earlier in the turn. Astrogators can double as pilots on small civilian ships. If a crew must perform double duty, in a roleplaying situation, he must say so at the first task and suffers a -3 DM on both tasks. Do not allow this in non rpg play.

Technicians are the maintenance crew for the ship, one for each 50 MCr of ship or fraction thereof. The technicians also form the repair crew that will move around the ship and do jury-rigs on battle damage. Repair crew are assumed to wear vacc suits and can do repairs on the outside of the ship (hull and surface locations) but this is done at considerable risk, especially when the ship is thrusting.

Signatures

A ships signatures, or Sig for short, measures how much the ship radiate for the various sensors, for radar it measures how much radar energy it reflects. Signatures depends on how you design your ship but also what the ship does, the captain has several options for signature reduction available to him.

Size The Size value is not really a signature, it simply represents the size of your ship. Each +2 in Size equals x10 larger ship in volume (and +6 DAB). Visual(Hull), Infrared(Hull), Radar(Hull) and Mass(Hull) all increase with your ships Size but so does the surface area, tradeoffs, tradeoffs. If a Sig has a value in parenthesis after the regular one it shows your ships Sig when the Hull has taken Light or more damage.

Visual(Hull) This is a measure of your ships reflectiveness in visual light. If the ship is in planetary shadow this Sig is reduced by -6. If a ship is Streamlined or better and faces directly towards the sun the Visual(Hull) Sig is reduced by -2, this does not apply in planetary shadow. Our Suleiman has +5(+7) as Visual(Hull) signature.

Visual(Thrust) This represents the bright light from the hot exhaust plume of fission or fusion rockets, it increases with ship size and thrust. Ignore this signature when the ship is drifting. The Suleiman has neither fission nor fusion rockets so there is no Visual(Thrust) signature.

Infrared(Hull) This represents the thermal radiation from the ships hull, this Sig increases with the Size of the hull. Infrared(Hull) is usually quite low but is valid even if the power plant is off from battle damage. The Suleiman has +1 as its Infrared(Hull) signature.

Infrared(Power) This represents the thermal radiation from the powerplant radiators, this Sig increases with power output. If a ship uses 10% or less of powerplant full power its Infrared(Power) is reduced by -2, this is called running on idle. The Suleiman with its 1.93 EP (if 1 dTon = 5 m3 48.3 MW) powerplant has an Infrared(Power) signature of +4.

Infrared(Thrust) This represents the thermal radiation from the hot exhaust plume of fission or fusion rockets, it increases with ship size and thrust. Ignore this signature when the ship is drifting. The Suleiman has neither fission nor fusion rockets so there is no Infrared(Thrust) signature.

Radar(Hull) This represents the radar reflective area of the ship, it increases with ship size and is significantly larger for open frame hulls. Popped down ships with retracted sensors and weapons have radar(Hull) reduced by -2 (it has no effect on open frame hulls), they are also unable to attack and suffer -2 on sensors. The Suleiman has a Radar(Hull) signature of +7.

Neutrino(Power) This represents the neutrino radiation from the fission or fusion powerplant, this Sig increases with power output. If a ship uses 10% or less of powerplant full power its Neutrino(Power) is reduced by -2, this is called running on idle. The Suleiman with its 1.93 EP (if 1 dTon = 5 m3 48.3 MW) powerplant has an Infrared(Power) signature of +4.

Neutrino(Thrust) This represents the neutrino radiation from the ships fission or fusion rockets, it increases with ship size and thrust. Ignore this signature when the ship is drifting. The Suleiman has neither fission nor fusion rockets so there is no Neutrino(Thrust) signature.

Mass(Hull) This represents the gravity force from the ships hull and its floorfield if present, it increases with ship size. A ship with its floorfield turned off has Mass(Hull) reduced by -2. The Suleiman has a Mass(Hull) signature of +7.

Mass(Thrust) This represents the gravity distortions from the ships reactionless thruster, it increases with ships size and thrust. A ship that is drifting has no Mass(Thrust) signature. The Suleiman has a Mass(Thrust) signature of +13 when thrusting.

The next section of the ship data holds the sensor values for each of the ships sensor types.

Scan = Sensor + Scan radius modifier (+Integration bonus)

Signal = Scan + Signature

-1 or less Undetected The target was not registered in any way and you get no information from it, not even if there was a target inside the scan or not.

0-2 Noticed You know there is something out there but not where, except somewhere inside your scan. The sensing ship is automatically Spotted if the target gets a Noticed+ result.

3-5 Detected You know where the target is but not its vector. Detected Radar targets will give you there vector instead of their position. The target is not spotted so you will not be shown its next move and you cannot yet attack it.  Radar only: The sensing ship is automatically Spotted by the target if it gets a Noticed+ result.

6+ Spotted You know where the target is, what its vector is and what kind of target its is. As long as the target is within max spotted range and line of sight is not blocked (from planet or aft centerline) it will remain Spotted and you will see how it moves before you perform yours. Oh, did I mention that you can now attack your target. Attacking with any beam weapon except meson guns will have the attacker spotted by the target automatically.  The sensing ship is automatically Spotted if the target gets a Noticed+ result.

The Suleiman has a Visual/IR Scan of +2 and a Radar Scan of +1.

ARM and DAB

Armor and damage absorption, or ARM and DAB for shorts, represent how hard the ship is to penetrate (except for meson gun fire) and how much damage the ship can take. Both ARM and DAB are logarithmic values where each +6 means x10 more (x10 thicker armor, x10 more hitpoints if you will). If a weapons PEN (Penetration) is less than the targets ARM it cannot harm the target and if a weapons DAM (damage) is less than the targets DAB it cannot harm the target. The table shows the values for ARM and DAB for each of the ships six hitlocations.

The Surface and Power locations need further elaboration. Surface hitlocation has two ARM values, the left one is when the sensors and weapons are popped up and the second value, after the slash, is for when they are popped down. When a ship is in popped down mode it cannot fire weapons, its sensors are reduced by -2 and all but open frame ships have their Radar(Hull) signature reduced by -2. Some designs may have two ARM values for the Power hitlocation as well. If so, the two values represents the ARM value when the powerplant operates normally and when running idle at 10% power output. The reason for this is that ships with high enough power density must have their power plant heat radiators extended from the hull and this make the more vulnerable.

Our Suleiman have the ARM and DAB values as shown on the table, not much to speak about there. As it has 2 EP or less per 100 dTon (0.1 MW per m3 or less) the power location has just a single value.

Well, thus endeth the fourth lesson in Do It Yourself starship design, please post questions, complaints or praise here at the blog/ Backman

Mnemonics Neatly Eliminate Mankind’s Only Nemesis;

Insufficient Cerebral Storage.

DIY starship part 3

Posted in Design system, Intercept on April 11, 2010 by Mr Backman

Sensors are important, more so than in any other space combat system, so I will go into a little more detail on those than the rest of the tutorial.  You can get the rules, design system etc here.

The Visual/IR sensor is the most important one, especially for the small ships typically used by players. It can be used in Visual or IR mode but not both. All sensors have inverse square range falloff (1/r^2) except radar which falls off as 1/r^4 and this alone may make you want to skip radars completely.

The fact that you cannot add more than one of each kind of sensor does not mean that the ships can have only one sensor per type; each sensor rating is the sum effect of several sensors spread over the hull, all working together. This means that sensors do not have any particular location (top, bottom, left, right, fore or aft) like weapons do. Neutrino and mass sensors are located in the Payload section and completely protected by the armor. Visual/IR and Radar sensors are located in the Surface location and have less protection from armor (-6 when popped up, -3 when popped down).

To summarise the strengths and weaknesses of each sensor type:

  • Visual/IR in Visual mode They are degraded when scanning in the direction of the sun, they are also blocked by planets. Enemies can reduce their visual signature by being in the shadow of a planets or, if they have streamlined or better hulls, face directly towards the sun. Visual stealth is the cheapest stealth, basically more or less advanced forms of broad spectrum black paint. Visual uses the visible spectrum and typically pick up sunlight reflected from the hull or fission/fusion rocket plumes.
  • Visual/IR in IR mode They are degraded when scanning in the direction of the sun, they are also blocked by planets. Enemies can reduce their IR signature by running their powerplants on idle. IR stealth which consist of covering the ship in radiators to reduce their temperature and routing heat to radiations that do not face the foe. IR uses the infrared spectrum and typically pick up power-plant radiators or fission/fusion rocket plumes. IR can also detect ships with turned off powerplants from their ambient hull temperature.
  • Radar They are degraded from the sun direction (yes, the sun shine in the microwave spectrum as well, I’ve done radio astronomy labs on old WW-II Wurzburg radars to detect the sun back in the day, I kid you not), they are also blocked by planets. Enemies can reduce their radar signature by popping in their sensors and weapons. Radar emit microwaves that bounce off the target back towards the sending ship. Radar scans are easy to detect but they also spot targets faster from the doppler information they give back. Radars suffer from the extreme falloff as mentioned above. Radar masking is radar absorbing materials and cleverly angled surfaces. Open frame ships have significantly higher radar signature.
  • Neutrino They are degraded when scanning in the direction of the sun (the sun spews out insane amounts of neutrinos yet the neutrino sensors of today are huge affairs that can only barely detect our own sun), neutrino sensors can see right through planets, they are the only sensors that can do that. Neutrino sensors see right through the hull so they are always protected by the ships armor. Enemies can turn off fusion or fission thrust and they can run their powerplants on idle to reduce their signature. Neutrino stealth is high tech and expensive but can further reduce signature. Neutrino detectors detect neutrinos created in fusion and fission reactions, these particles fly straight through ordinary matter and are very hard to detect. The efficient neutrino sensors and stealth of Intercept are high tech magic not grounded in any real world physics.
  • Mass These sensors can scan right at the sun without degrading but are blocked by planets. Enemies can turn off their reactionless thrusters and turn off their floorfield to reduce mass signature. Mass stealth is expensive but can reduce the signature of ships further. Mass detectors detect the gravity from the mass of ships and the gravity waves sent out by reactionless drives and floorfields. The efficient mass sensors and stealth of Intercept are high tech magic not grounded in any real world physics. (My previous incarnations of Intercept had the mass detectors measuring tidal forces with inverse cube falloff  but I scrapped that from purely aesthetical reasons; the falloff values for scan radius would have been 1.5 x that for Visual/IR which didn’t look good and was hard to remember, I am still not quite sure I made the right decision there.)

We give our Suleiman a medium sized Visual/IR array and a small radar. At TL-13 they have Scan +2 and +1 respectively.

Turrets and bays

Each weapon is either Fixed in the hull itself or it is mounted inside one of the mounts; Small turret, Large turret, Small bay or Large bay. Fixed mounts are always at the front of a ship and can fire in that arc only. Turrets and bays have 180 degree firing arcs and must be placed top, bottom, left, right, fore or aft. If you have turrets and bays taking up more than half the ships total surface area they cannot all be mounted on the same side. Note that Fixed mountings take up less surface area than the same weapon inside a turret or bay, also note that 10 weapons in 10 mounts take up more surface area that the same 10 weapons in a single mount, pick as large a mount as you can to conserve your precious surface area.

Canon has the Suleiman having only one turret but we choose to give it one top mounted large turret and one bottom mounted small turret. The large turret can hold up to 0.6 dTons of weaponry (or 3 m3 if 1 dTon = 5 m3), the small turret can hold 0.2 dTons (or 1 m3 if 1 dTon = 5 m3). We will put a laser and a missile launcher in the top turret and a single sandcaster in the bottom turret. If you want the classic three weapons to a turret simply pick a large turret only and choose a smaller laser so all three weapons fit inside it.

Sandcasters and screens

For historical reasons we collectively call ship defenses for ‘screens’. There are no shields in Intercept as they have the pungent smell of Trek and suffer severely from handwavium.

Sandcasters shoot streams of crystal ‘sand’ against enemy lasers working like a combination whipple shield and laser absorber. Sandcasters do not work against missiles in Intercept, you better add some low powered lasers as countermissile defense. A ship must have Spotted its enemy to use its sandcasters. Only one screen battery per ship may defend against each attack. A single battery may defend against each and every attack volley. This make very good reasons to group beam weapons into few batteries and also to group screens into few batteries.

Nuclear dampers are used against nuclear missiles but there are yet no rules for nuclear missiles in Intercept so we ignore them for now.

Meson screens defend against meson attacks by modifying the decay times of the incoming particles, they should be grouped into as few batteries as possible for the same reasons as for sandcasters above.

Missiles

It may seem smart to have missile launchers as Fixed mounts to reduce surface area, but that is not the case as after each turn of missile thrusting the launching mount must be able to ‘see’ the missile as the missiles are operator guided to the target.

Missiles are launched from the drift position so you may think it would be clever to mount missile turrets on the bottom of your ship (or at the top with the ships rolled when doing missile attacks), pop them and thrust away like mad while your missile gunner steer the missiles from his back facing turret. Sounds like a good idea aside from the danger of your enemy simply maneuvering into your rear centerline and thus break the missile link. The rear centerline is blind while thrusting, you see; from drive plume or gravity disturbances.

As you get positive DMs from grouping launchers into larger numbers and as defensive lasers may fire at all incoming volleys you should go for few but large volleys for maximum effect, this also happens to simplify things when playing the game.

We put one small missile launcher in the top mounted large turret for our Suleiman ship. Missile launchers hold 3 volleys each in the launcher, add more by giving your ship a missile magazine. Note that the design system does not include the cost of the missiles themselves, nor for that matter, fuel, life support consumables, crew salaries, poker chips for the off duty crew etc.

Beam weapons

Beam weapons do not really fire beams at all, in reality they fire pulses. All beam weapons except meson guns automatically spot your ship for the target after the combat phase. There are three kinds of beam weapons:

  • Lasers guns Lasers fire pulses of coherent light, shorter wavelengths at higher tech levels. The defenses against lasers are sandcasters and armor but high thrust Gs can make you harder to hit.
  • Particle guns Particle weapons fire pulses of relativistic neutrons. Armor is the only defense against particle weapons but high thrust Gs can make you harder to hit.
  • Meson guns Meson guns don’t fire mesons at all, this is a mixup that has refused to die dating back to the Vilani wars with the Solomani. Meson guns fire stable particles that are forced to decay by a nuclear booster soliton wave catching up with the pulse when it is inside the target. Defense against meson guns rely on meson screens alone as meson fire completely ignores armor, high thrust Gs helps as they make you harder to hit. Meson guns work very well with the Neutrino sensor as both the sensor and the meson pulses go straight through a planet.

The Suleiman has one laser in its large turret with good enough penetration to barely penetrate the armor of a Suleiman. A duel with two Suleiman scout/couriers will be a drawn out one, thanks to the heavy armor.

Well, this wraps it up for this time, next time I will talk a bit about the game values calculated by the design system and how everything fits in with the Intercept game.

Friends don’t let friends watch Star Trek.

DIY starship part 2

Posted in Design system, Intercept on April 10, 2010 by Mr Backman

Hello again. This is the second installment on how to build ships using my Intercept design system.  You can get the rules, design system etc here.

Payload

The payload area holds the cargo and hangar bays if any, missile magazines if any, the computer, neutrino and mass sensors and any repair bots. Cargo and Hangar bay volume should be input in dTons (or m3 if the 5 m3 dTon option is used). Cargo and Hangar bay also have fields for entering load in tons so you can calculate actual thrust Gs and frame Gs for loaded and unloaded configuration. I will later change the design sheets so this calculation will be done automatically. Our Suleiman will have 5 dTon (25 m3) cargo hold. Note that the missile magazine entry says “3 missile volleys in launcher”, this is just a reminder that the missile launcher themselves hold three missiles per launcher. Enter a number above 3 to have more reloads for the ships missile launchers if any. The computer then, the clunky old Traveller computers with their quaint model numbers. Just enter the model number you want and see if the TL you picked has it. Above the model limit of a given TL you need 10 parallellcomputers and after that you need 100 parallell computers, beyond that nothing helps. Note that as you go over teh single computer price rises much fastaer. We know from canon that the Suleiman needs a model-2 in order to perform astrogation for J-2.

Next come the neutrino and mass detectors. You may wonder why I haven’t grouped all sensors into one place and the reason is simply that Visual/IR and Radar must work outside of the ships hull but the neutrino and mass sensors see right through the armor and are therefore placed in a separate hitlocation. Our trusty Suleiman has neither neutrino nor mass sensors so we add none. The robots entry let you replace your technicians with robots if you want a highly automated ship. Robot technicians has Computer# -4 skill so before Model-4 they perform worse than regular technicians but take up considerable less space. The Suleiman has no robot technicians so we add none.

Crew

The crew area of the ship holds lifesupport, freezers, various crew stations, the crew living area and the ships floorfield. Lifesupport come in three varieties:

  • Basic lifesupport Temperature and air, sufficient for up to 24 hour operation. Sanitation facilities are of the diaper variety.
  • Full lifesupport temperature, air, sanitation etc. can keep crew alive indefinitely given enough supplies.
  • Closed life support Same features as full lifesupport but it needs no supplies as it recycles water, air, urine, feces etc, think high-tech greenhouse.

Each crew and passenger require lifesupport but robot technicians does not. The Suleiman has four double occupancy staterooms according to the deckplans so we give it 8 Full lifesupport units which need 0.25 tons of supplies per man-week. We assume enough supplies are stored in the cargo bay as buying life support supplies is not part of this design system. Freezers hold crew or passengers in suspended animation. In Traveller there is something called the ‘frozen watch’ which means a duplicate crew complement that gets thawed out when the crew has taken enough casualties. There can only be one frozen watch though, as the frozen watch will also take casualties from crew damage. Activating the frozen watch requires a morale throw if that optional rule is used; activating the frozen watch is a brutal reminder that the high command consider crew expendable. We add two freezers to our Suleiman.

The next couple of entries are the various forms of crew stations. All crewmembers require crew stations except the technicians and robots.

  • Limited station Small and cramped station where the crew begin to suffer fatigue after 4 hours. Negates 2 Gs of  thrust. Think jet fighter.
  • Limited tank Small and cramped station. Filled with oxygenated fluid to counter acceleration. Fatigue sets in after 4 hours, negates 5 Gs of acceleration.
  • Full station Large and roomy cramped station where the crew begin to suffer fatigue after 8 hours. Negates 2 Gs of  thrust. Think wet navy station.
  • Bridge station Even larger station with lots of extra displays. Fatigue after 8 hours, 2 Gs negated. Ships with these for each crewmember win initiative ties for Ship tactics and Fleet tactics.

We give our Suleiman 4 Full stations as. Next up is the living area which encompass the staterooms, freshers, mess, corridors and whatever else the crew can move around in. Larger living area let the crew do longer missions without physical or psychological risks, the safe trip endurance is noted for the entry. We give our Suleiman 32 dTon (or 160 m3) living area, enough for 8 crew to live in space for a month before physical and psychological risks appear. Roleplayers have a tendency to cram in too many people in their cramped ships, let them roll for physical and psychological illnesses. Nothing livens things up more than the 120 kg engineer raving about space ghosts and then goes on a murdering rampage with his coolant wrench.

The last entry for the crew location is the floor field. A floor field simulates gravity and counteract acceleration. As noted earlier, the crew stations counteract some of the acceleration Gs and the floorfield does too. Subtract the crew station G protection and the floofield strength before applying acceleration Gs fatigue (these fatigue rules are not yet in the Intercept game rules but they will be, trust me). Any remaining acceleration G is applied as a negative DM on all tasks. Choose whether the floorfield should apply to living room and crew stations only or if you will have it in the cargo and hangar areas as well.

All right, this wraps things up for this time. Next installment will cover the sensors and weapons as well as the ship ratings and how some of the stuff ties in to the Intercept game.

Conserve space; dump in jump!